Ancient Tools Optional for Toolsmith 1.2.19
optionalNo matching file
Vintage Story Mod DB · Vintage Story mod
Version 1.2.X is here! A MASSIVE thanks to ODs of Reforged Tools! Thanks to their help with various tool parts, this version has exactly what I wanted to add since the start - proper tool rendering for your tools based on the parts they are made of! And using
Quick answer
Toolsmith 1.2.19 targets 1.22.0, 1.22.1, 1.22.2. It must be installed on the client. Installation on the dedicated server is optional. No extra mods listed for this file.
Where it goes
It must be installed on the client. Installation on the dedicated server is optional.
This release supports both sides, but the source does not require it on the server.
1.2.19. Change the file and its required mods may change too.
This file does not list any required mods. Do not add a library just because a different file uses it.
We only count dependency files that match this setup. A file for another loader does not fill the gap.
Before you install it
Built for Toolsmith 1.2.19. Pick another file and the loader, install side or required mods may change.
Use 1.2.19. It targets 1.22.0, 1.22.1, 1.22.2; another release may have different loader, side or dependency requirements.
This file does not list any required mods. Do not add a library just because a different file uses it.
It must be installed on the client. Installation on the dedicated server is optional.
Use the “Get this file” button beside 1.2.19. It opens that exact file at the source.
About this project
Version 1.2.X is here!
A MASSIVE thanks to ODs of Reforged Tools! Thanks to their help with various tool parts, this version has exactly what I wanted to add since the start - proper tool rendering for your tools based on the parts they are made of! And using their awesome style of tools seen in Reforged Tools as well! All of the vanilla Tinkered Tools now will show their respective parts and I think it looks absolutely incredible! You will have to re-build your tools from the base pieces to construct the data needed for the rendering, but otherwise it should work! Do let me know of any issues that may arise on the Official Discord, please. Be sure to grab the right version for your version of Vintage Story, the main download is for 1.20.12 and below, while the rc.1 version is for Vintage Story 1.21! This version also removed the old placeholder handles entirely, and any that still exist will be unknown items. If you are starting a new world or this is your first time downloading the mod, you don't have to worry about this! It's only for anyone who is updating old worlds and/or updating the mod! If you experience any issues, first try clearing the config and the mod cache! The config has been overhauled a bit as well, so resetting that is likely a good idea for everyone. More modded tool support and additional addons/renders for tools to come in due time though!
Keeping these around just in case it's still useful for some! For most people, use the most recent version, and these likely won't effect you!
Before updating to 1.1.4!
If you edited the configs already and wish to keep your settings, copy the config files out of the config folder before you update and start the game! Configs will now automatically update and regenerate themselves with every new mod version! This makes it easy for everyone, no more having to manually reset them, unless you want to make changes everything is handled automatically! If you wish to make changes, just look in Toolsmith.json at the very top to turn this off. If you run a server, any changes to your configs should be sync'd with clients now.
Quick notice for version 1.1.0+!
If you used Toolsmith before this, I HIGHLY recommend that you back up your save before updating just in case, as a good bit of the core functionality has been reworked and made more dynamic! Also please delete your old config files and let the mod make new ones, default settings have changed a good deal, and old settings can be bad or cause trouble! If you are loading up an old world from before 1.1.0, you will need to run the Remapper that should pop up when you join, and then restart your game after it finishes. If you are on a server, your server admin has to do this and restart the server! Mod page has been updated with the new info, and I am in the middle of adding in the requested Handbook pages as well! Cause of this rewrite, I wanted to get it done and out along with a bunch of fixes, and mechanics have changed so now I can spend time writing better handbook info pages.
This is Toolsmith! Inspired by the old Toolworks mod and similar, but I rebuilt it from the ground up in my own way with two driving goals behind the mod. The first one is the base idea of giving your tools a bit more customizability and reusability by giving each part a durability, and the second is to create a more realistic feel for your tools. If this sounds like a change you've always wanted, keep reading on! It's been designed from the ground up to work alongside Smithing Plus, but it isn't mandatory, just recommended!
Thanks for giving it a look, and if you read this far I hope you enjoy the idea already - feel free to leave any questions or comments in the Toolsmith Thread on the Official Vintage Discord, or down below in the comments! Beneath here is a bit more of an in-depth breakdown of how the mod currently works, and what it involves, so please give it a read if you have further questions. It'll be updated as the mod updates, but it's a lot to handle on my own! Also - if you feel so inclined and able, any donations are accepted at the link at the donation tab above, or if you want to check out the source code, follow the Github link up top as well!
I wanted first and foremost to make it a system that instead rewards the player for interacting with it instead of penalizing, and most importantly, will work out of the box with any mod's tools so long as it is configured properly. To this point, if there are any mods you find do not work immediately, let me know and I can add compatability to the default configs! All tool and part detection and stat lines are fully exposed in the Config files, so adding compat or tweaking things should be as easy as just editing them. It should also be possible to add in your own materials for handles or bindings as you please, or adjust the default settings I set up! If you opt to stick to the vanilla method of just using sticks and no binding material? Your handles and bindings will have the same durability as a vanilla tool of the same teir. The main change on top of this is that your tool's head will be more durable (currently 5x vanilla tool tier durability), and if you keep it well maintained, it will last for a very, very long time.
This loops back to the second driving goal, a more 'realistic' feel for your tools. A real tool could stay functional for generations if it was well-kept, and as a friend of mine joked around with, 'If I bought an axe and it broke after chopping down three large trees, I'd be pissed! I'd demand my money back!' A big change Toolsmith makes is a deliberate step away from that more 'Survival Crafter' idea of consumable tools, and tries to make something a bit more like Valheim if you have played that. The cost is shifted a little away from the metal, and more to the handles and binding materials of your choice.
-- General Overview --
Right now, Toolsmith changes exactly that, your tools! It classifies them into one of two types, a Tinkered Tool or a Smithed Tool. A Tinkered Tool is a tool that follows the vanilla conventions of a Tool Head on top of a Stick to craft that tool, while a Smithed Tool is named such because it either has just a one-step process like smithing a Chisel or has a complex crafting recipe that lacks distinct generic 'parts', but this is expanding to include more and more. Both of these tools can also be classified as Blunt, which means it has a static Sharpness level and a much lower chance to damage the tool head on any use.
Tools now have a second visual bar on them if they are not blunt! This second bar represents how sharp the tool is, and it is important to keep your tools from getting blunted if they aren't already supposed to be. For a quick overview, Sharpness will wear down as you use the tool just like Vanilla Durability, but as it lowers, the efficiency of the tool will slowly decrease. When you use a fully sharp tool, there is a small period where none of the parts - should it have multiple parts - will take any damage. This doesn't last too long as that level of sharpness will quickly deteriorate, but it is a reason to fully sharpen them when you choose to! After this though, the handle and bindings of a tool will take damage again, but until the head gets more dull it still might be able to go without chipping or taking durability hits.
As the tool gets more dull through use, this chance to damage the head will go up until it is always happening on every use - to remedy this, you will want to hone your tool on a Grindstone or Whetstone! While your tool gets more use and becomes duller, it slowly incurrs a steady chance of acquiring a Drawback. Drawbacks are small debuffs that will effect one part of the tool or another, like the head chipped a nasty chunk out of it and is at risk of more damage to that spot, or maybe a fracture starts to form in the metal and if you keep straining it, it could entirely crack apart. ( -- Drawbacks are not currently implemented yet, but are in progress! -- )
The durability bar still functions like it should, but for a Tinkered Tool it will visually display whatever durability is the lowest in your tool. That means if you use a Handle that is almost broken in a fresh tool, it will reflect that!
To go along with the basic description of Sharpness above, I'll break down the more specific points of the math involved and the curve calculating when and what exactly happens. This may get a bit math-intensive, so it might be hard to understand for some people!
Durability Damage -
Probably the biggest factor here, the durability. When the tool is at or above 98% sharpness, no part of the tool will be damaged if you use it, but this still consumes a point of Sharpness. This is true for both Smithed tools and Tinkered Tools! After this point, the "Head" of the tool - or in the case of a Smithed tool the tool itself - will have a flat (and configurable) chance to get damaged, by default it is 15% likely to take damage on any use. Should the tool drop to a completely dull state at 0 sharpness remaining, you will incur a guaranteed drawback and should you choose to keep using this tool in this state, the head will take double the durability damage. You probably should sharpen it at this point!
Handle and Binding -
For tools with a handle, binding or other parts, the bindings will start to damage after the tool drops below 98% sharpness, and the handle will start to damage after it hits lower then 95%. Below these points though, it is a guaranteed chance to damage barring other modifiers on the tool like a grip or treatment. But below this point Sharpness will not effect the chances.
Tool Speed -
While your tool is sharp, at or above 90% sharpness, you have a slight speed bonus since the tool is so sharp! It comes out to a small increase of 5% to the speed of the tool. Conversely, when the tool is starting to get blunt, it will be harder to use effectively and you will have a 10% speed penalty. It isn't too much, and better parts can still easily offset this, but it's there to encourage you to hone the tool back to max!
Drawbacks - (while not implemented yet, it will be in the future!)
When your tool is above 80% Sharpness, there is no chance for anything to go wrong with it! After this point, it is a slow curve upwards to a small chance maxing out at 20% sharpness remaining, after which the chance remains constant. So the more dull the tool, the higher the chance for something to go wrong with it! But, your tool can only ever have a single Drawback at a time, and it can be repaired in different ways depending on the Drawback in question. More to come on this when it is further implemented!
These are both used to re-sharpen a tool, in exchange for damaging the Tool or Tool's Head durability! The Grindstone can be used any time and won't really wear down since it's such a large chunk of stone, but Whetstones on the other hand are a more portable form of sharpening your tools. They are knapped from any knappable stone to make a flat surface on which to try and hone your tools, but they tend to wear out fairly quickly and only last about three full sharpens before you'll have to grab another. There will be upgrades to these to come that last longer, or provide a better curve for the damage and resulting in less durability damage overall, but they are in progress. For now, it is better to sharpen once and for a long time, as the longer you sharpen your tool for, the less damage it will take. But if you frequently oversharpen your tools, you will find them wearing down a lot faster!
This one will be shorter then the Sharpness at least! But it still goes hand in hand, of course! By default each 'tick' of sharpening will return 1% of the total Sharpness, so that it is now consistant how much is built up and how long it will take to go from 0 to 100.
Durability Damage -
When you start honing your tools, instead imagine this works from reverse compared to Sharpness's effects - starting at 0% sharpness and working up to 100%. The honing math is based on the duration you have been honing the tool; the overall sharpness % you have regained during that honing session, not the sharpness levels itself! It is important to keep that in mind for these percentages.
From 0 to 20% of the total sharpness, the total sharpness honed will be consumed from the durability of the tool or tool's head at a 1 Sharpness for 2 Durability. Then it will gradually decrease linearly as it goes from 20% total sharpness honed to 40%, at which point it is an even 1 for 1 ratio. After this point though, to encourage longer periods of honing, very quickly drops off to a 5% chance to damage the head at all at 50% Max Sharpness. After this point it sits at a constant 5% chance to actually damage the durability! So sharpening once for longer periods and maxing it out gets the most out of it!
There are a few ways you can put together your Tinkered Tools now!
To build any Tinkered Tool, you can take the Tool Head you want and hold it in your main hand, then place a Handle material in your offhand. Now just hold rightclick to bundle them together and you will produce a single item, a Head and Handle pair! This intermediary step lets you set aside a head with a handle before you make the full tool, but they do not stack. When you want to actually construct the two into your tool proper, you can optionally grab a Binding material and hold that in your offhand once again and hold rightclick while holding the Part Pair in your main hand just like before. Even without a binding this works - and after a bit of crafting, you'll have a complete tool!
When you have a Saw, you can craft yourself a Workbench, and those slots in the middle of the table can be used to craft tools. Take a look at the icons and the In-World tooltips when you glance at any slot for which part goes where, and once you have all your parts in their slots, take a hammer and right click any of them a few times to craft your tool together!
If you wish to use the Grid Crafting method, it must be enabled in the mod settings. This is disabled by default just to clear up RAM and lower the boot time for the server, since it was only going to be growing bigger and bigger with the shear number of recipes being created. If enabled, procedurally generated recipes for every handle, head and binding are created so any combination can be used to construct a Tool.
To Deconstruct your tools before they break, all you have to do is take the tool in question to your Grindstone or your Workbench. If you are using your workbench, look at the Vise to the left side of the workbench and hold rightclick on it with the tool you wish to deconstruct. If you are choosing to use your Grindstone, you can just do the same but anywhere on the block. No matter what method you choose to use, if your Binding material is damaged at all you will be unable to recover it successfully since it needs to be damaged to take apart the head from the handle without breaking those pieces any. So please be aware if you make any mistakes constructing your tool, be sure to take it back apart before you use it!
Or a metal-based smithed tool!
You will need a Workbench to start a proper reforge as you need a nice surface and some extra tools (supplied from the toolbox on the Workbench itself) to prepare the item and get it ready for reforging. Over to the right of the Workbench, infront of the Toolbox, is the proper place for it. If you have a tool head or smithed tool that has less then 90% durability remaining in it, just put it down on your workbench and grab your smithing hammer to give it a nice whack with Rightclick to properly prepare it for reforging. This will convert it back into a Smithing Recipe workpiece, but you will notice that based on the amount of damage that the tool sustained before this, some portions of the metal head will be missing and need replacing or that a bit of metal has been bent out of shape. This is where Smithing Plus comes in handy! Using it's Smithing with Bits you can easily patch this up without using a full ingot and in return your head will be almost brand new once more!
See the above dropdown for how to use your Workbench to Craft!
-- The Tool Types --
These types of tools are the main meat of the mod! These tools are where you can put more care and effort into producing them, make a better proper handle, give it a grip, maybe even treat the wood, and finally secure that head on better with a proper binder. There are a few options for putting them together, so for now pick whatever you please. Because vanilla has no requirements for binding materials, you can opt to not use one - and instead just have to slap that tool head back on the handle when it comes off again. Just check the tooltips for the Heads and Handles to see their remaining durability percentage when your tool might fall apart. In addition to this, all valid Handles, Bindings and Tool Heads will have tool tips added to them that indiciate what part they are as well as if they are looking to be in a decent condition or not. Check the dropdowns for a bit more on each of these part types! Generally they are organized with the cheapest and weakest at the top, and the more expensive and better options following.
These will depend on what tool you are looking to craft, but the materal choice is still the most important. The base durability of the basic 'vanilla' tool is what determines the base for the others on your tools. So Iron or Steel tools will have a similarly larger health pool like in Vanilla over Bronze or Copper, and of course the use-speeds always get better with better metals. This is to keep a similar level of scaling that is in base game tools - even allowing for purely vanilla values for use time - while still expanding on it with care. The only default change from Vanilla is that a Tool's Head will have a part durability that is 5-times that of the base tool, making it a good bit more reusable even if you are slapping them on sticks! This is also configurable in the options though, and can be tweaked as you please.
When it comes to Tool Sharpness, you can either grind the full tool, or just the tool head alone, and it will hone the item. Some tools have a Blunt Head which wont need to maintain a sharp edge to keep it effective, instead they will just have a small chance for taking damage on use that remains flat the whole life of the tool. This only effects the head though, not the handle or bindings. A solid block of metal for your smithing hammer is pretty unlikely to wear down just from using it as it was intended!
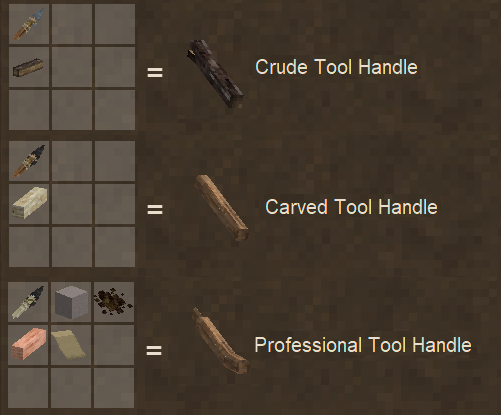
There are four different classifications of handle you can use for a tool, the better handles also take some strain off the bindings, and let them last longer:
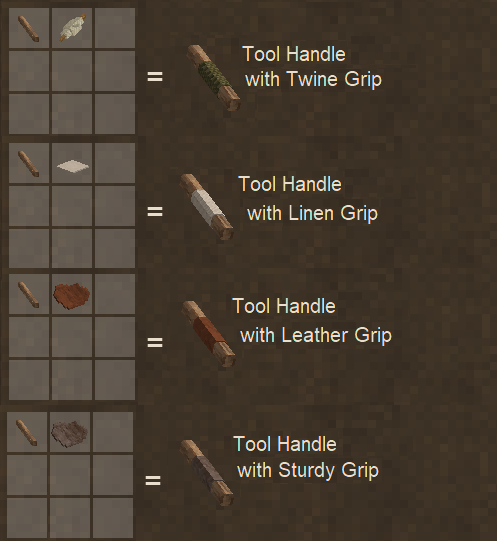
Adding a grip to your tool can make it easier for your Seraph to use that tool a little faster, and thanks to having a proper grip, sometimes a proper swing will negate any damage to the handle, extending it's use! Currently there are a few options for grips, but don't go wasting that sturdy leather on a crude tool handle (or if you really want to pull a power move... go right ahead):
Finally, a grip isn't required, either! Maybe you don't have any materials to spare, or any on hand, so a lack of grip is as valid as having one! It just, well, won't provide any bonuses of course!
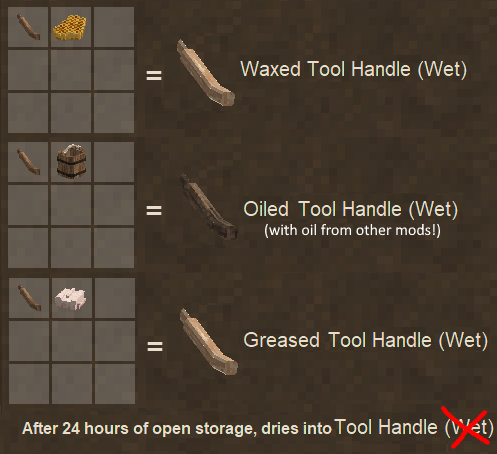
Inspired by medieval methods of treating wood, there are a few options on hand to protect the handle from the elements that make sense for the time:
Once again though, a treatment isn't required! A non-treated handle works as well as a treated one, it just might not last as long!
Bindings are important for keeping that tool head secure. Without one you can still use a tool, but it'll come loose after a while and need to be re-attached! The stronger the material used for the binder, the longer it will last for and even help dissipate some force from the tool's strikes so the handle lasts a little further. Most of the time, the binding material will be damaged just through using the tool, so unless it has been recently applied and not used too much, the binding likely will not be recovered. Any binding made from a fabric will not need the original full item, but instead take a knife to it to cut them into strips, and these can be used as bindings! Two for the price of one! Optional Bindings include:
If any of these three main parts (Head, Handle or Binding) hit zero durability, the tool will fall apart, but if the Head or Handle still have durability you can reuse them. As mentioned before in the Bindings section, if they have not been used to below a certain window they can be reused again. This should cover most of everything about Tinkered Tools!
Smithed Tools are both tools that you may create through smithing that result in the finished tool upon completion - or any more specific tool that does not follow the conventions of having different parts like a handle or a binding, where those would not make sense to use. Some examples of each are the Vanilla Shears and Chisel, since they are produced fully as soon as you finish their smithing recipe, and some modded tools like the Rolling Pins from Expanded Foods, or the Creaser from Art of Growing. They represent a more singular tool that doesn't have varied parts, but those that still can benefit from the Sharpness and Reforging (where applicable) will be able to!
These tools are still crafted in their own ways, but they can also be considered a Blunt Tool just like Tinkered Tools can. If you have a Blunt Smithed tool, it functions the same as a Blunt Tinkered Tool!
-- Miscellanious Tweaks or Changes --
For now this section will be small, but it is for any other changes that Toolsmith makes that don't really fall into one big grand catagory. Right now all Toolsmith includes is a patch for Copper to make it Cold-Forgable! Cold forging copper is possible, so why not also ingame? But you still need to heat up any bits or additional metal to adhere it on to an existing piece! It's at least easier to pound out a shape and play around with the crafting system when you are getting started forging for the first time.
Smithing with Bits! A version of this is built into the mod by default, so you can use bits to smith your pieces as well! If you use Smithing Plus though, Toolsmith will disable this patch automatically in favor of Smithing Plus's version entirely.
Config Help -
If you want a small guide to the config options for Toolsmith, check in this section! But it is in need of a rewrite again with the recent 1.1.0 update, so please bear with me! I'm always available to answer questions and provide assistance in the Toolsmith Discord thread on the official Vintage Story Discord! If anything seems off from the new defaults, it might need an update.
Some of these options are either out of date or moved around now, another rewrite of the configs happened moving them into the JSON files under Assets/(Mod Domain)/Config/Toolsmith - Check these for examples on how you add your own Json files for easy compat!
---
This file contains the core config options for the mod, turning on and off certain settings, adjusting some values, and the core registering of what actually constitutes a 'Tool' in the Mod's system. Always the registering of a tool and parts will be contained in the bottom portion of the file so the important and simple settings remain on top. The current simpler settings are as follows:
Now after this point is where the config gets more complicated and can be ignored unless you are looking to add compatability yourself to other mod's tools, or add functional parts to handles or bindings. Generally this part of the config shouldn't be touched unless you know what you are doing, and this section is what is important to regenerate now and again if you are looking to update the default config settings. Any time inherent mod compatability is added, it will be changing this section most likely. I won't include the default strings for these because it would be a wall of settings, it would be better to just let the mod regenerate a fresh config file if you wish to take a peek at the settings! It's also going to be a bit more technical in the explanations as well, it helps if you understand the layout of the base game's Json files for items and blocks. The first five settings use Regex to parse through the loaded items in the game while looking for what validates as a 'tool', and which kind it is. For these five settings, if you want to add an entry, just follow the default example and add a | before the ) and followed by your additional string to compare with.
These three strings dictate what the mod looks for and considers a tool.
Finally, these two config settings are entirely explicitly defined Dictionary entries of full Codes as the key, for respective tool parts, handle or binding - followed by any tags for the specific stat information defined in the other file.
Future Plans and Ideas -
Peek here if you want an idea of what I have planned or am currently working on! For a much more complete and updated list, check the Github and the Roadmap under the Projects there! Feel free to add any ideas or criticisms in the comments as well and I'll try and listen to them. If it's really a great idea and it fits the idea of the mod extremely well, it might inspire me to add it sooner then later, haha.
Next up on the list:
Later down the line (or just constant progress now and again):
FAQ (Please Read Me!) -
How do I use the different handles? / How do I apply a binding?
Please read the tooltips on various items! I've left indications if something is a valid part, what kind of part it is, and most importantly, how to use them. Your Tool Head has instructions on using the In-Hand crafting method, and after the first step, read the tooltip on the middle step to continue and add an optional binding. If you want more info, please read the Construction And Deconstruction dropdown in General Overview above.
Will Weapons work with Toolsmith?
Not currently, but it is being worked on! If you want more information on it, check the Github link up above and then click on the Projects tab once there. I have set up a Roadmap with a bunch more information on what I have planned, and the goals I'm going to strive for with it!
What do the other two slots on the Workbench do?
They currently are semi-unused for crafting a tool, but they are intended to be used for tools that require more then 3 parts!
I don't like the tool models. Can you change them back?
There is an option in the Client Config file to entirely disable the multi-part rendering code, it will disable any distinction for what tools are made of what parts and return the vanilla models. Sorry you don't like it, but I can't do more then this without additional help really - the shear amount of models that would be needed for that is a lot, and to keep updating the mod while maintaining a whole ton of part models and wanting to add more capabilities and everything is just not feasible and I rather not spend the time doing that when I have other obligations and want to add actual functionalities to the mod.
If you are interested in making your own part designs for everything and need any assistance or help to understand what is needed, I more then welcome the effort and the help! Just shoot me a message on the Toolsmith Thread on the Vintage Discord or otherwise let me know, and I can help you out! It would be possible to then upload it as a separate addon mod, or otherwise incorporate it into the base mod if you wished.
Mod Compat -
If you find something that isn't working as listed here, do let me know! If you also find a mod that has tools that you want to integrate with Toolsmith, let me know those mods! I can help provide configs and update the defaults packed with the mod as I hear about them. Below is the list of mods that I have personally used in my own playing of the game, or have been alerted to and been able to update the default configs to account for them as well. Please read through this if you have any questions, and feel free to let me know if anything was missed or needs an update!
Anything in here will have more information as to why it is in here! As always, if anything changes, do let me know!
I hope everyone finds this useful, and if you have any ideas or feedback, I'd love to hear it! If there's any mod compatability problems, make sure to check the dropdowns right above this, I might have an answer already there. Again, please let me know if there's any additional modded tool support I can add to the default configs on the Issue Tracker above or over in the Toolsmith Discord thread, or if you simply have any questions I can answer them as well! And please, if you are experiencing a bug, it would be tremendously helpful if you had your server and client logs uploaded somewhere for me to read through them, and an idea of what steps I have to take to try and reproduce the issue. The issue tracker above is great for this! I want to help, but I cannot help if I cannot reproduce the issue on my end to see what's going wrong.
Another option is the official Vintage Story Discord, and the Toolsmith Mod Thread on there! Feel free to message me in that thread with any ideas or issues as well, but if you have bugs, please do have your logs and modlist ready still! And while it's absolutely not required, if you wish to support the mod past that, there is a donation link above! I hope you enjoy Toolsmith!
Credits and Special Thanks -
Maltiez for directing me towards his working Textures from Attributes and sending me some untested multi-shape rendering by attribute as well! I based a good bit of the rendering work on this!
Jayu for Smithing Plus and inspiring some ideas, and helping me get things working smoothly with it as well!
Meister Dwight for finding and editing together the new scraping and honing finished audio when honing a tool!
NolandVoyd gets a MASSIVE thanks for pointing out and helping me fix the math curves for damage and sharpening and everything!
Ross for more feedback and ideas based on real smithing experience, as well as bouncing code and ideas my way!
ODs for all the amazing work he did on the various part models and model upgrades for the Grindstone and Workbench!
Project description from Vintage Story Mod DB.
Pick your setup
Choose the version and loader you play, then open the matching release.
Showing the newest 12 of 47 game versions. Older files are in the list below.
Check the dependencies, then try the file in a copied instance before changing a world you care about.
Recent files
toolsmith_1.2.19.zip
15 Aug 2026
toolsmith_1.2.18.zip
2 Aug 2026
toolsmith_1.2.17.zip
28 May 2026
toolsmith_1.2.16.zip
15 May 2026
toolsmith_1.2.15.zip
14 May 2026
toolsmith_1.2.14.zip
18 Oct 2025
toolsmith_1.2.13.zip
16 Oct 2025
toolsmith_1.2.12.zip
8 Oct 2025
toolsmith_1.2.11.zip
8 Oct 2025
toolsmith_1.2.10.zip
26 Sept 2025
toolsmith_1.2.9.zip
25 Sept 2025
toolsmith_1.2.8.zip
17 Sept 2025
Looking for an older file? The official Vintage Story Mod DB project page is in Resources.
 mod
modHandbook enhancements, faster Creative Inventory, and optimized crafting for large modpacks.
 mod
modSimple mod that add making aged wooden, corroded, ashlar stuff and much more
 mod
modGeneric crafting system that completely replaces the UI grid with a more immersive mechanic